Tuesday, September 13, 2011

Finally a shirt for me!

I have had this shirt and paint to make me a shirt for a while now, but I just could never decide what kind of design to do, after a LOT of googling, I finally found one I liked! Since my shirt was so dark I had to do a few layers of the paint....apparently it doesn't work as well doing it that way, some areas peeled up and the freezer paper was hard to peel off...hrmph, so it didn't turn out as great as I had hoped, but it's still pretty cute. I am a little nervous to wash it, I hope it still looks good! Also, I had no idea there were sparkles in the paint until the corner of the wing peeled up a little...it doesn't look like there is sparkles at all in the bottle or when I was painting it on the shirt...kinda weird!

*Pictures aren't in order cuz Blogger sometimes drives me crazy!*


Wednesday, June 29, 2011

Aye aye aye...

I made another purse...not sure if I will ever make one again...but realistically...I am sure I will. Haha! Let's just say...making purses makes me ornery. I do love getting a reaction out of people when I get a compliment on my purse and I tell them I made it! I just wish it would turn out EXACTLY as it did in my mind. I mean, it basically did, but the side pockets were meant to be for my phone, etc, and they just turned out pretty narrow, but I was not about to unpick another piece of thread! All in all, I really do like it, I just think I need a day without staring at it all day.

Inside pocket
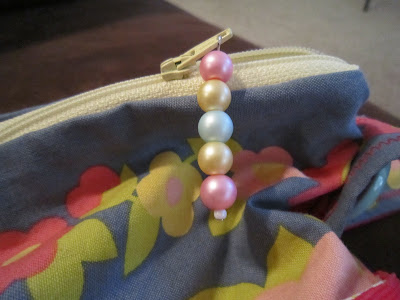
Zipper pull
Button detailing
Back view of the purse with a large pocket
Front view
So...what do YOU think? :)

Saturday, April 16, 2011

Custom Onesies

My sister and I were going to a baby shower for our friend who is having her first boy and we needed a gift. My sister came up with the great idea to make some custom onesies! Here are the ones I made! We hand drew our ideas on to some freezer paper and came up with some pretty cute ideas!

I decided to make a little jersey type one in red because they are Utah Utes fans, and the number 04 cuz he'll be the 4th family member :)


She is also a Disney FANATIC so I decided to make a simple Mickey head.

I just love how they both turned out! My sister will post hers when she gets a chance!
I am loving this homemade "screen printing" thing! I think it's such a great way to customize your clothes and to spruce up some old tees!

Have you tried this yet? I would love to hear about it!

Thursday, April 7, 2011

I am a really great NO baker! :)

Around Christmas time I was really craving some no bake cookies. I am pretty picky about my no bake cookies so I wanted to be sure and find the perfect recipe. I seriously googled something like "number one best no bake cookie recipe ever". Let me tell you, they are the creamiest no bake cookies I've ever tasted! It's probably the evaporated milk! I used quick oats, I have tried using regular but I feel like they don't work as well. With the quick oats, the cookies have a more melt in your mouth kind of texture. With the regular oats it was kinda crunchy and they didn't set up as well! I made some today for the first time since the holidays and they are delish! I made them so many times during Christmas that I had the recipe memorized, but today I had to look it up! Here it is!

2 cups Sugar
1/2 c. evaporated milk
1/2 cup butter
3Tbsp. Cocoa
3 c. Quick oats
1 tsp. Vanilla
1/2 c. Peanut butter

Combine sugar, milk, butter and cocoa in saucepan (I cut up the butter so it doesn't take so long to melt) and bring to a boil. Once boiling, time for 1 minute (over this time, the cookies will be very crumbly, under, they won't set up. So be as specific as possible)
After the 1 minute, take off from heat and add the peanut butter and vanilla and stir until peanut butter is melted. Then add the oats, it looks like you have way too many oats for the chocolate mixture, but trust me, just keep stirring and it's perfect.
Once everything is mixed together spoon out(at a good pace, they start to set up pretty fast) cookie portion sizes onto waxed paper (I used two layers because one time I didn't and the cookies had melted the paper onto the counter!) Let cookies cool just at room temperature and enjoy!

All the ingredients I used

Don't do this with the cocoa...good thing I was home for the day!
This is about to be something incredibly delicious!
Pampered Chef has the perfect tool for measuring out peanut butter!
Not the prettiest cookies ever but they sure taste yummy!
I'd love to hear any feed back from you who use this recipe and instructions! Let me know how they turn out and good luck NO baking! ;)

New Ribbon

So, I haven't ever really LOVED the ribbon that was on our picture frame hangy thing. Plus I have been wanting to change the color of green that's in our house for a little while now. One day when I was at Walmart I found some pretty cool green ribbon, but the only problem was that it was too skinny to really give me the look I wanted. So I thought that layering it with another wider ribbon would be kinda cool. I wanted the green to be perfectly centered on the brown so I used a little glue stick and glued the two ribbons together. It's not exactly the color of green that I have been wanting but the ribbon was too cool to pass up, especially since the design on it is almost identical to the design on the bird decals!

The finished product. What do you think? :)

Sunday, February 20, 2011

The pretty awesome gift!

So my brother's birthday isn't until next week but we were having a party celebrating a few birthdays so I gave him his present early. So now I can post pictures of it! :)
My brother does a lot of bike races and people have taken some pretty cool pictures of him so I was trying to figure out a cool way to put it on a shirt...they have the printable iron on paper but I have used it in the passed and I don't really like how it looks, you can tell it's homemade and it cracks and peels a lot so I was reading this blog and I have seen some things she has done with this technique like this and this. If you read the presidents shirt tutorial it tells you to posterize the image so you can know what things to cut out...you can do this technique in a program like Picnik, (Picasa has a new edit button featuring Piknik, just FYI). Anywho, with this picture the posterize feature didn't work too well, probably cuz there is too much detail. So I decided to do more of a somewhat simple silhouette. So I had my husband outline the picture and some miner details. I then traced it on to freezer paper. Luckily I have my cutting mat that I got recently so I was able to use my exacto knife to VERY CAREFULLY cut out all the details. (make sure you have drawn the picture on the non-waxy side) After cutting it all out, I had so many small pieces and that I needed to make sure to keep every single one. (if not, there wouldn't be a space between his arms or legs, etc.) Anywho, after laying it all out on the t-shirt I ironed it on, this is the first time I have made a shirt like this and it was actually all working out really well! Pretty cool how the wax side becomes an iron on stencil! Once it was all ironed on, I ironed it again, just to make sure all the corners were down so that no paint would leak through. I couldn't find the paint I wanted anywhere! Joann's had the right kind but only in pastels...that didn't really scream my brother's name, so I made some phone calls and found out that Michael's had pretty much every color of the rainbow of the paint I needed. Anywho, after I ironed it on I used a sponge type paint brush and blotted it on, the girl in the blog I read uses brushing strokes but I was afraid it could lift up all the little corners, so I just wanted to blot it on. I made sure to cover every little spot. It had to sit for at least 4 hours so since it was about midnight at this point, I just had to wait til morning to reveal my awesome artwork :). When I woke up that was the first thing I did! I was so anxious to see how it was going to work out! As I was peeling off the freezer paper I was SO HAPPY with how it was turning out! Well, this post is becoming a LOT longer than I thought, but here are some pictures of some of the steps. I also used my new sewing machine and did the same technique I used for the boys names on the pillowcases to put the name of the race underneath the bottom right side of the picture. Everyone thought it was pretty cool and when my bro opened the present and I kept telling him that it was him, he didn't get it right away and then he realized that the actual image was him! I am pretty sure he thought it was amazing! Probably cuz it is... :)

So I took this image...I made it black and white though just so the lines would show up better to trace it.
Here is the outline that my wonderful husband made
Here is the stencil cut out and ironed onto the shirt
THE FINISHED PRODUCT!!! (minus the name of the race...I forgot to take a pic after that, oopsie) I am pretty proud! :)

Wednesday, February 16, 2011

The Boys' presents!

So like I mentioned before I decided that for my niece/nephews birthdays this year I am going to give them a keepsake pillowcase with their name on it! With this tutorial it's really very easy! I decided this time instead of hand stitching their entire name like before, I would use the cool feature on my new sewing machine! But I wanted something a little more unique so I got some letter patches from JoAnn's and then stitched around them to make sure they won't fall off over time. It was actually kind of hard to stitch through them since the letters are pretty thick and have a sticky residue on the backside, so the stitches look a little messy, but I don't think the boys will mind:) I want each pillowcase to be very personal for each child, so I learned what things they like right now, fave colors, etc and bought the fabric accordingly! I did learn something with these this time around...I have been washing all my fabrics before sewing and these one's for some reason frayed so much and since I only bought the exact measurements I needed, it was a little hard to try and match everything up. So next time I don't think I will wash them, or maybe just buy a couple more inches so they have room to fray! I hope they love them! (I also hope they don't fray and fall apart after all my hard work! yikes!)